 button on the Dashboard.
This chapter explains the functions available through the Transactions menu, and includes the following sections:
Overview............................................................................................... 13
About Proxy Relationships..................................................................... 23
Adding a Preclearance Request.............................................................. 24
Submitting a Postclearance Request...................................................... 25
Adding a Broker Confirmation................................................................ 25
Cancelling a Transaction........................................................................ 27
Searching for a Transaction.................................................................... 28
Looking up a Security Symbol............................................................... 30
Creating a Transaction Summary Report................................................. 31
Viewing Transaction Detail..................................................................... 31
PTA provides access to screens that you can use to:
4 Add a Preclearance transaction
4 Add a broker confirmation
4 Cancel a Preclearance transaction
4 Search for transactions
4 View transaction detail
4 Cancel an adjustment transaction
The procedures in this Guide are based on the assumption that you are acting on your own behalf. However, a PTA administrator can make you a proxy for other users. As a proxy, you have the ability to act on behalf of someone else.
A proxy is a person who has been permitted to act on behalf of another person. Any User can be made a proxy, and any User can be made the object of a proxy. Only Compliance Administrators can set up a proxy relationship.
For example, a senior executive who travels a lot often cannot access PTA in a timely fashion, or does not want to enter her own information. She could authorize Compliance to set up her executive assistant or administrative assistant to enter information into the system on her behalf. However, rather than use the executive’s password and user ID, the assistant would be given a user ID and password, and be assigned as Proxy, which allows him to enter information on behalf of his boss. This allows PTA to track who entered the information.
Proxies can be given rights to only transactions, only certifications, only disclosures, or to all three or a combination of all three. This is set by Compliance.
If you were made a proxy for user John Smith, the User field in each procedure would list John Smith’s name as well as your own. By selecting John Smith as the user, you can then enter transactions for him.
A Preclearance is a request for permission to execute a financial transaction; PTA can be configured to compare it to your firm’s transactions, along with other checks required by your Code of Ethics or Personal Investment Policy.
You will receive one of the following messages once you submit your Preclearance.
Approved, Denied or Pending
Note: This function may not be visible in your system depending on how your administrator configured its appearance.
To submit a Preclearance request, access the Preclearance Entry screen using one of the following methods:
4 Click the button on the Dashboard.
–or–
4 Mouse over the QuickLinks icon ![]() and choose Preclearance.
and choose Preclearance.
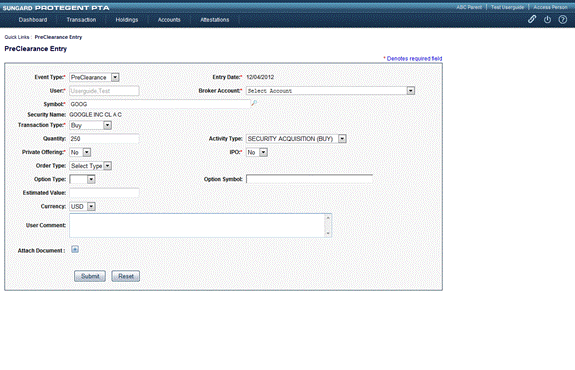
Enter or select the following data:
4 User—Your name is displayed. If you are a proxy for another user, you can select that person’s name.
4 Broker Account—Select the account from the drop-down list.
4 Symbol—Enter a value in the Symbol field, or search by clicking the ![]() icon. For more information about searching, see Looking up a Security on page 30.
icon. For more information about searching, see Looking up a Security on page 30.
4 Transaction Type—Buy or Sell.
4 Quantity—Enter the quantity of shares.
4 Private Offering—Yes or No.
4 Secondary Offering—Yes or No.
4 IPO (Initial Public Offering) —Yes or No.
4 Activity Type—Select a financial event that can occur in the account, such as an exercise of options, from the drop-down list.
4 Order Type—Select an order type from the drop-down list.
4 Option—If the Preclearance transaction is an option, click the checkbox and select an Option Type (Put or Call). Enter the Option symbol in the Option Symbol field.
4 Estimated value—Enter a numeric amount.
4 Currency—Leave the default, US Dollars, or select a currency from the drop-down menu.
2. (Optional) Enter additional transaction information in the User Comment field.
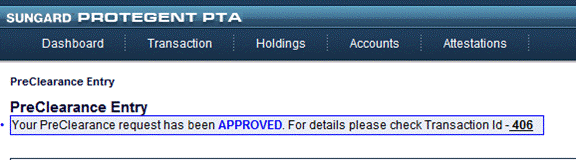
3. Click Save. A confirmation message provides a Transaction Id with a link to the Transaction Detail page. The following illustration shows the message for a completed transaction.
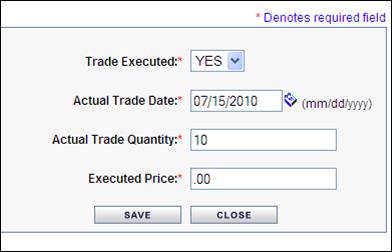
To submit a Postclearance, access the Preclearance Detail screen by clicking on the Transaction ID.
1. Click the ![]() button. The Postclearance dialog box will open.
button. The Postclearance dialog box will open.
2. Review/Modify the value for Trade Executed.
3. Review/Modify the Actual Trade Date.
4. Review/Modify the Actual Trade Quantity.
5. Specify the Executed Price.
6. Click Save or Close.
To enter a broker confirmation, access the Broker Confirm Entry screen using one of the following methods (note that this function may not be available for all users):
1. Mouseover the QuickLinks icon ![]() and choose Broker Confirm, or, if certifying to a Quarterly Transaction Certification, click the Click here to enter Confirm link found in the bottom right corner of the of the Certification Detail screen.
and choose Broker Confirm, or, if certifying to a Quarterly Transaction Certification, click the Click here to enter Confirm link found in the bottom right corner of the of the Certification Detail screen.
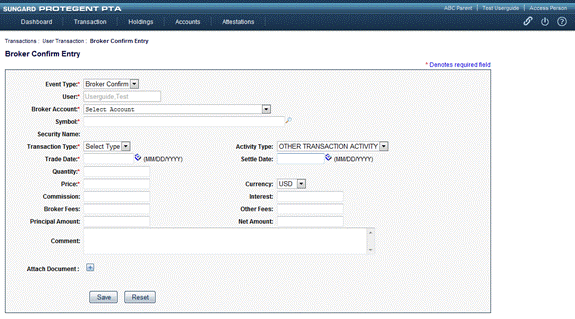
2. Enter or select the following data:
4 Specify the Symbol. To search for a security, click the ![]() icon.
icon.
4 Select a Transaction Type (Buy or Sell) from the menu.
4 Select the appropriate Activity Type
4 Enter the actual Trade Date.
4 Specify the Quantity of shares traded.
4 Enter the Price at which the shares were executed.
3. Click Save. The following screen will display with a notification that the Broker Confirm has been submitted. Clicking on the Transaction Id will bring you to the Broker Confirm Detail screen.

You can cancel the following types of transaction requests:
4 Adjustment
4 Initial holding
4 Preclearance
To cancel a transaction request:
1. On the Transactions menu, select User. The User Transaction window appears.
2. Search for the transaction you wish to cancel. For information about searching, see Searching for a Transaction on page 28.
3. Click the Update button next to the Preclearance you wish to cancel.
4. In the pop-up window, click the Cancel Tran button. The following illustration shows a sample pop-up window. The contents of your pop-up window may vary slightly.
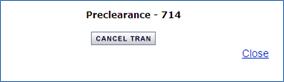
5. PTA displays the Edit Note dialog box. (Optional) Enter a note to explain the reason for the cancellation.
6. Click Save.
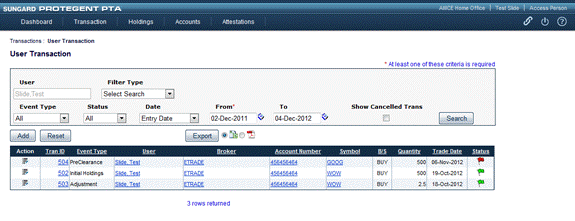
To search for a transaction:
1. On the Transactions menu, click User. The User Transaction window appears.

2. Select a filter type and a filter value. The following table describes the filter types and filter values.
|
Filter Type |
Description |
|
Account Number |
Enter one or more numeric characters, followed by an asterisk (*), to return a listing of all transactions having a broker account number beginning with the specified number(s). |
|
Broker |
Select a broker from the drop-down menu to return all transactions involving the selected broker. |
|
Cancelled |
Yes returns all transactions that have been cancelled. No returns all transactions that have not been cancelled. |
|
Confirm Match |
Yes returns Preclearance requests that have been mapped to a broker confirm. No returns Preclearance requests that have not been mapped to a broker confirm. |
|
Currency |
Select a value from the drop-down menu. |
|
Monitored Account |
Yes/No. Not-monitored accounts are not subject to PTA rules. |
|
Post Cleared |
Yes returns all matching Pre-Clearance transactions that have been updated via the Post Clearance pop-up window. No returns all matching Pre-Clearance transactions that have not been updated via the Post Clearance pop-up window. |
|
Security Class |
Enter the Security Class. |
|
Security Id |
Enter any valid security id. (used by firms with internal security identifiers) |
|
Symbol |
Enter one or more characters; use an asterisk to perform a wild card search. |
|
Tran Type |
Select a transaction type from the drop-down menu. |
|
Transaction Id |
Enter any valid Transaction Id. |
3. Fill in other fields as needed, and click Search. PTA lists the transactions that meet your search criteria. Once you have clicked on a result, the system changes its color from blue to black to show that it’s been viewed.
Note: The system is optimized to display only search results needed for onscreen field displays. Results needed to populate the additional fields that appear in exported reports are not retrieved until the user clicks the Export button. This optimization means faster search times, but a slight delay in the time it takes to generate and export a report.
When you are not sure of a security’s symbol, you can search for it in PTA using the symbol search. This function is represented by a magnifying glass icon:

To search for a security by symbol:
1. From the Filter Type list, select Symbol.
2. Click the ![]() icon. The Security Lookup window appears.
icon. The Security Lookup window appears.

3. In the Filter Value field, enter as much of the symbol as you know and add a wildcard by adding an asterisk (*). For example, if you believe the symbol begins with the letter H, type H*.
4. (Optional) To limit your search further, click the blue plus sign and add up to two more filters.
5. Click Search. The Security Lookup window displays the search results.
6. Click the symbol of the security you wish to select. PTA displays the window from which you came. The symbol now appears in the Symbol field, and the Security Name field displays the name.
You can search for selected transactions and save the search results as a Transaction Summary report. You can save the report to either PDF or CSV (Excel) format.
To view a summary of selected transactions:
1. Search for the transaction of interest. For instructions, see Searching for a Transaction on page 28.
Note: The results shown on the screen are limited to improve search performance. Reports contain additional fields.
2. Save the results to the format you prefer:
4 PDF—Click the button next to the PDF icon ![]() , and then click Export. PTA displays the report. To save it, click the Save a Copy command at the top left of the window.
, and then click Export. PTA displays the report. To save it, click the Save a Copy command at the top left of the window.
4 CSV—Click the radio button next to the ![]() icon, and then click Export. In the File Download dialog box, click Save.
icon, and then click Export. In the File Download dialog box, click Save.
The Transaction Detail screen provides extensive information about a transaction. The information it provides reflects the transaction as of the date and time the transaction was entered into PTA.
To view transaction detail:
1. Search for the transaction of interest. For instructions, see Searching for a Transaction on page 28.
2. In the search results, click on the Tran Id link of the transaction of interest. The Detail window appears for the type of transaction you selected.
In the following illustration, the validation rules applied to the Preclearance are listed at the bottom of the window. To view the text of a validation rule, click the link in the Validation Rule column.

Note: The rules are not displayed for all PTA user roles.
A violation occurs when your executed trade conflicts with one of your firm’s policies. Violations in PTA only occur on Broker Confirmations. You can search for your violations using several criteria. (Note: This function may not be available for all users.)
To search for a violation:
1. On the Transactions menu, select Violations. The Violations window appears.
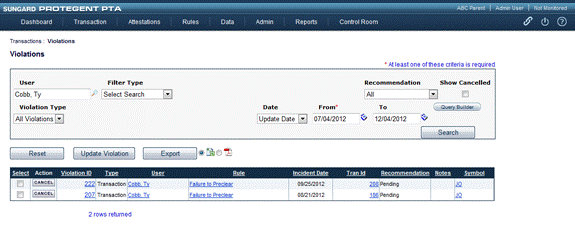
2. Enter or select values for the following fields:
4 Filter Type
4 Recommendation
The following table describes potential recommendations; your firm’s may differ.
|
Recommendation |
Result |
|
Assess a fine in the specified amount. |
|
|
A memo concerning the violation is added to the user’s file. |
|
|
No action is to be taken. |
|
|
Describe the action taken in the Add Compliance Notes field, if desired. |
|
|
Transaction remains in Pending status. |
|
|
A formal reprimand will be added to the user’s file. |
|
|
A retraining order will be added to the user’s file. |
|
|
A warning letter will be added to the user’s file. |
4 Validation Rule—Select from the drop-down list.
4 Date—Choose one of the following:
o Update Date (default)—Date on which the violation record was changed.
o Create Date—Date on which the violation record was created.
o Trade Date—Execution date of the transaction that caused the violation.
4 From and To dates— Enter the dates in MM/DD/YYYY or other appropriate date format, or use the Calendar icon (see page 14).
3. Click Search. The Violations window displays the search results. The following table describes the columns in the search results. Click a hyperlink in any column to view the corresponding detail.
|
Column |
Description |
|
Violation Id |
A unique identifier for the violation record in the PTA database. |
|
User |
Name of the User to whom the violation applies. |
|
Validation Rule |
The name of the rule that could not be validated. |
|
Trade Date |
Trade date of the transaction that caused the violation. |
|
Tran Id |
Transaction Id of the transaction that caused the violation. |
|
Symbol |
Ticker symbol for the security traded in the transaction. |
|
Quantity |
Quantity of shares traded in the transaction. |
|
Recommendation |
Action taken by the compliance administrator. |
|
Notes |
Comments entered regarding this transaction. If no notepad icon appears, no notes have been entered. |
You can view the details of a violation and add a comment if you wish. To do this:
1. Search for a violation, following the procedure in Searching for a Violation on page 32.
2. From the search results, click the Violation Id for to the violation you want to view. The Violation Detail window appears.
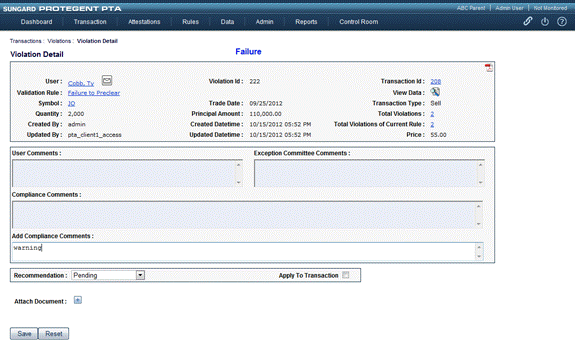
3. (Optional) Enter text in the Add User Comments field.
4. Click Save.